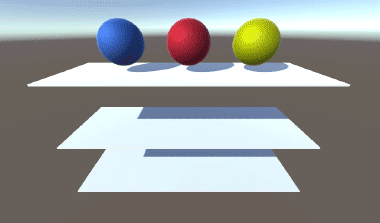
Collisions
Most of the time, you will want your particles to be able to collide with and react to other elements in your scene: walls, floor, crates, and whatnot. They can also collide with each other! These two types of collisions (against colliders and against other particles) can be controlled independently in Obi. Everything in this section applies to all Obi actors (cloth, ropes, fluid emitters, etc) so it's a quite important topic.
Setting up collisions
Add a ObiCollider component to any collider in your scene to make it work with Obi. You can add this component to SphereColliders, MeshColliders, BoxColliders... pretty much all standard Unity colliders, both 3D and 2D. The only collider types not currently supported by Obi are PolygonCollider2D and TilemapCollider2D. At the beginning of each simulation step, solvers will generate collision constraints for all their particles based on what colliders are spatially close to them.
This is how the ObiCollider component inspector looks like:
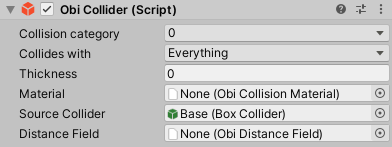
Each collider lets you specify a category value, and which categories it is allowed to collide with. See the collision filtering section below for details.
ObiColliders also allow you to set their collision material and their thickness. Positive thickness values will leave a gap between the collider surface and colliding particles. Negative values will cause particles to "sink" into the collider before actually hitting its surface.

Intercollisions
ObiActors can collide with each other, provided that they're both simulated by the same ObiSolver. Particles simulated by different solvers cannot interact with each other, which means actors in different solvers won´t be able to collide with each other.
Self collisions
To make an actor collide with itself, just enable the "self-collisions" checkbox in its inspector.
Surface collisions
Obi 6.0 and up allows you to use surface-based collision detection on a per-actor basis, which is more accurate than particle-based. To use it, all you need to do is enable the "surface collisions" checbox in your actor's inspector. For details, see: surface collisions.
Collision filtering
Sometimes you need an actor -or even specific particles- to ignore some colliders or particles. You can use categories and masks for this. Each collider/particle can be in one of up to 16 categories, from 0 to 15. Masks determine which categories a collider or particle is allowed to collide with. It's possible for a mask to allow collisions with more than one category, or with all of them.
For instance: a particle in category 5 with a mask that allows collision with categories 8 and 10 would collide against any particle or collider in categories 8 and 10 whose mask also allows collisions with category 5.
By default colliders and particles are set in category 0, and their mask allows collisions with all categories.
if ((A.mask & B.category != 0) && (B.mask & A.category) != 0)
	MayCollide(A,B);
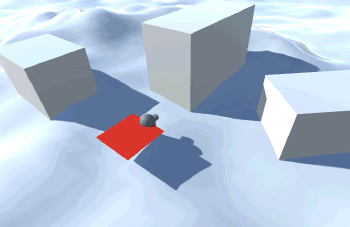
In the following animation the floor colliders are set to collide only with categories 0, 1 and 2, from top to bottom. The cloth balloons are set in categories 0, 1 and 2, from left to right.
The ObiCollider component has two filtering fields: Category and Collides with. These allow you to set the category and mask, respectively.
All ObiActors allow you to set categories and masks for individual particles. Depending on the actor, this is done in slightly different ways:
- ObiCloth:
- category and mask are specified on a per-particle basis using the cloth blueprint editor.
- ObiSoftbody:
- category and mask are specified on a per-particle basis using the softbody blueprint editor.
- ObiRope / ObiRod:
- category and mask are specified on a per-control point basis using the path editor.
- ObiFluid:
- category and mask are specified on a per-emitter basis in the ObiEmitter inspector.
Rigidbodies
When you add an ObiCollider component to an object, it will look for the first Rigidbody component up its hierarchy and attach an ObiRigidbody component to it. This allows for full two-way coupled interaction between Obi particles and rigidbodies. If you delete this component, Obi will recreate it automatically the next time you hit "Play".

ObiRigidbody only has one parameter: "Kinematic for particles". Enabling this shields the rigidbody from any forces applied by particles, so it will behave as if no Obi particles were present in the scene. The particles will still "feel" the rigidbody and collide with it, though.
How it works
Obi's collision pipeline is split into 3 steps: the broadphase, where objects (colliders, simplices or particles) are tested for rough spatial proximity. The narrowphase, where potentially colliding pairs generated by the broadphase are filtered, processed and contacts are generated. And finally, collision projection, where the trajectories of simplices/particles/rigidbodies involved in each contact are adjusted to prevent collision.
You can adjust various parameters of the collision pipeline in the solver settings. These will affect how the bounding boxes for particles and colliders are built, and how contacts are generated.
Collision constraints
Once you´ve set up collisions, your solver will begin generating collision constraints (aka contacts) for particles, using the 3 steps outlined above. Obi uses a collision detection paradigm known as "speculative contacts". This means contacts will be generated before any actual collision has taken place between particles, or between colliders and particles. Thanks to this, the trajectory of particles in collision course are corrected before the collision actually takes place, and tunneling issues (the well known bullet-trough-paper problem existing in most collision engines) are almost non-existant. Contacts are detected and resolved even at high speeds. Also, TOI (time of impact) ordering is not needed if several collisions happen in the same frame.
Some contacts never cease to be "speculative", they do not progress past the broadphase and they're never actually resolved. Some others eventually progress to a real collision, and collision resolution takes place.
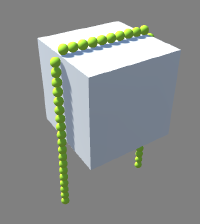
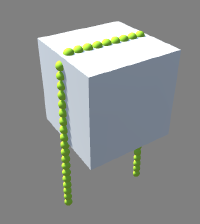
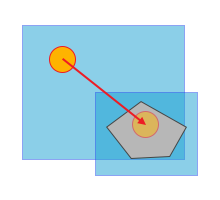
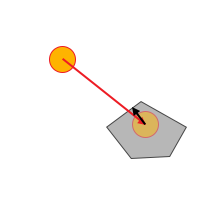
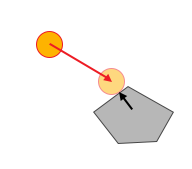
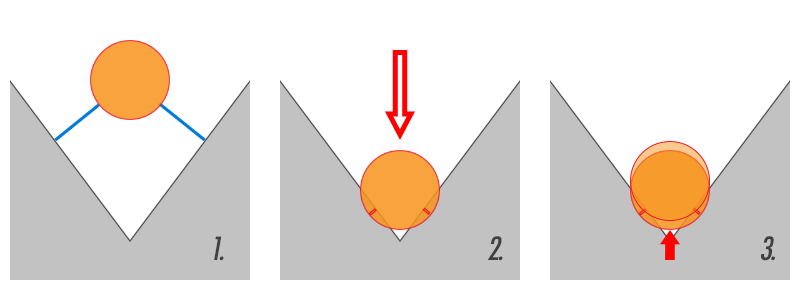
Several contacts can be generated for a given particle in the same frame. Then, speculative contacts must be accounted for and then resolved if they turn out to be actual collisions. However, resolving contacts sequentially (one after another) can unfortunately cause previously resolved contacts to become collisions again. See the following diagram: In step 1, two speculative contacts are generated because according to the orange particle's current velocity, it is almost certain it will collide with the grey collider in the next frame. In step 2, both speculative contacts progress to actual collisions that must be resolved. Step 3 shows how the right collision is resolved first. In step 4 we resolve the left one, but this causes penetration for the right one again. We must solve the right collision a second time (step 5) to ensure no penetration happens for either contact.

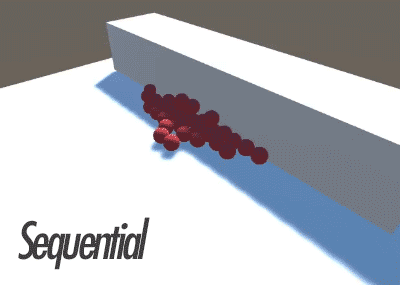
All this right, left, right, left... iterative solving causes visual jittering, as we see the particle jump between two configurations until all collisions are resolved (which can take a very high amount of iterations). For this reason, Obi lets you decide (as it does with all constraint groups) how collisions must be resolved: sequentially or in parallel. In parallel mode, all contacts are resolved independently in the same step (as if the others did not exist) and the final correction is calculated as an average of all their individual results. This increases stablity (removing jittering due to unresolved collisions) but decreases convergence speed (achieving zero-penetration takes more iterations) making collisions seem too "soft" when using low iteration counts. See the next diagram:
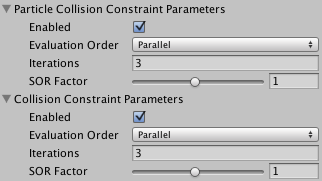
General rule of thumb: If multiple collisions can happen at once in your scene and jittering is an issue, set your collision constraints evaluation order to "parallel". If jittering is not a problem and/or you need faster convergence, use "sequential" evaluation order. There are separate controls for particle-particle collisions and particle-collider collisions, so you can use different methods for each of them. You can find this settings in the ObiSolver inspector, under "Particle Collision Constraint Parameters" and "Collision Constraint Parameters":
See ObiSolver for more info on sequential vs parallel solving.
Shock propagation
Shock propagation is a technique that modifies particle masses internally during contact resolution, so that particles at the bottom of a pile have higher effective mass that the ones at the top. This results in faster convergence and stabler stacking. You can find this parameter in the ObiSolver inspector, it is applied globally per-solver. Use this when you need an extra "oomph" for your particle-particle contacts, specially when creating piles of granular material.