Fluid rendering
Obi supports two fluid rendering techniques: ellipsoidal impostors and isosurface meshing, implemented by ObiParticleRenderer and ObiFluidSurfaceMesher, respectively.
Obi Particle Renderer 
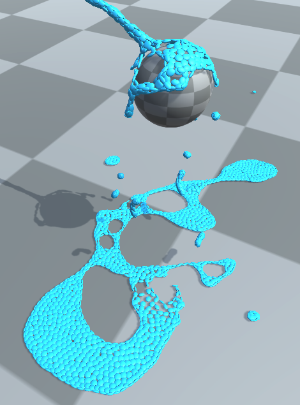
Impostors are a special type of billboards (camera-facing quads) which look like perfectly-lit, highly tesselated 3D ellipsoids, at a fraction of the cost. The ObiParticleRenderer component can be used to render your fluid particles as tiny ellipsoids using this technique. While typically not suitable for final rendering, this is useful to visualize and debug the simulation. It can also come in handy to render granulars.
In order to do this, just add the ObiParticleRenderer component to any actor (for instance an ObiEmitter, but it can also be used to draw cloth or ropes, see particle rendering). You can also set the color of the particles, and scale the radius used when rendering them.
The default material used for particle rendering has been created using Shader Graph. You can find it Obi/Resources/ObiMaterials/Common/ParticleShader.shadergraph.
Obi Fluid Surface Mesher 
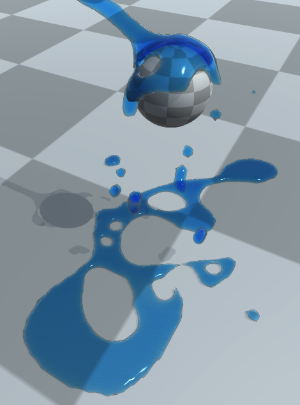
This component renders the surface of the fluid as a mesh. Setting up fluid rendering requires three steps:
- Add a ObiFluidSurfaceMesher component to the emitters we want to render. Surface meshers take a ObiFluidRenderingPass as input.
- Create a ObiFluidRenderingPass asset, which contains rendering parameters for all meshers using it.
- Create a ObiFluidRendererFeature, which is used to render additional data for transparent fluids.
1) Creating a surface mesher
By default, ObiEmitters created from the Object menu already have a ObiFluidSurfaceMesher component in them. Should you need to create one manually, go to Component→Physics→Obi→ObiFluidSurfaceMesher.

Pass
Rendering pass used.
2) Creating a fluid rendering pass
ObiFluidSurfaceMesher requires a fluid rendering pass asset as input. You can create one by clicking the "Create" button in the mesher's inspector (the newly created pass will then be automatically assigned to the mesher), or by right clicking on a project folder and selecting Create→Obi→Fluid Rendering Pass and then assigning it manually to the mesher.
Passes determine how fluid meshers are grouped together to form a single fluid surface: meshers sharing the same pass will be merged and produce a single mesh, meshers using different passes will generate separate meshes.
Passes expose a set of parameters that determine how the mesh is generated and rendered. Let's take a look at them:
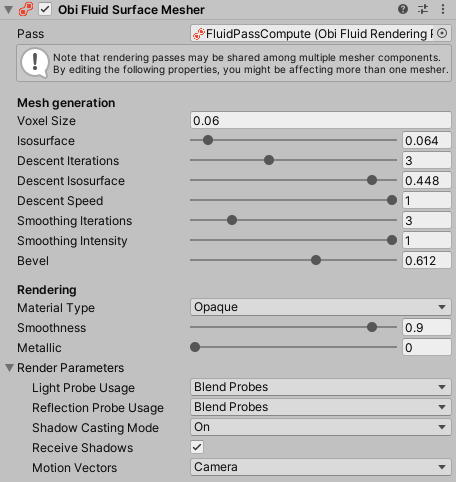
Mesh generation
These parameters control how the surface mesh is built from the particle-based fluid.
- Voxel size
- Controls overall mesh quality. Small voxel sizes lead to highly detailed surfaces that are costly to generate - while large voxel sizes lead to cheaper, less detailed surfaces. If your voxel size is too small performance will be negatively affected, and if it's too large, small drops and other fine details will be lost.
A good starting value for the voxel size is the size of your fluid particles. You can check the size of a particle in the info bubble that appears at the bottom of your fluid blueprint's inspector. If you are using the same pass to render multiple emitters with different blueprint resolutions, you typically want to use the particle size of your highest resolution blueprint (as it will produce the smallest particles).Using a small voxel size has a huge impact on performance, so keep this parameter at the highest value that yields acceptable results.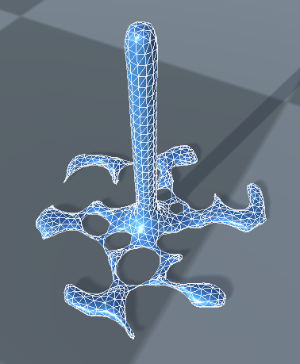
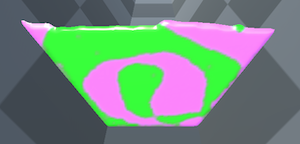
Surface mesh using a large voxel size (0.08) 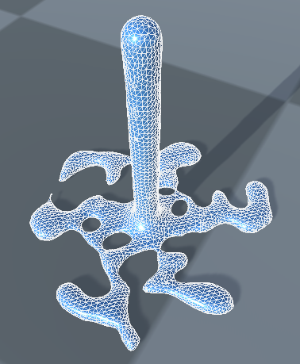
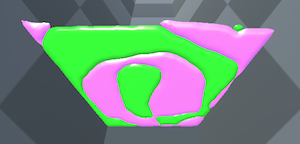
Surface mesh using a small voxel size (0.04)
- Isosurface
- Offsets the fluid surface, blending particle properties together to obtain a smooth surface. At a value of 0, the fluid surface sits at the border of each particle's smoothing radius, where fluid density reaches 0. Increasing the isosurface value will offset the surface inwards, towards areas of greater density.
High isosurface value (0.1) 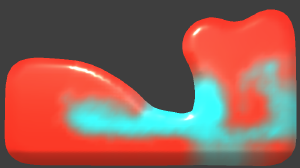
Low isosurface value (0)
- Descent iterations
- Amount of gradient descent iterations. Once the initial isosurface has been sampled at the specified voxel size, surface vertices are further moved towards higher density regions using gradient descent. The resulting effect is denser sampling at virtually no cost. This parameter controls the amount of descent iterations.
- Descent isosurface
- Target isosurface value to descend towards. This is added to the Isosurface value to determine how much vertices are shrunk during gradient descent.
- Descent speed
- How much each descent iteration moves vertices towards the descent isosurface.
- Smoothing
- Amount of laplacian smoothing applied to the surface mesh. More iterations/higher intensity yield smoother surfaces. Higher smoothing tends to shrink the mesh, obtaining thinner tendril and sheet-like structures.
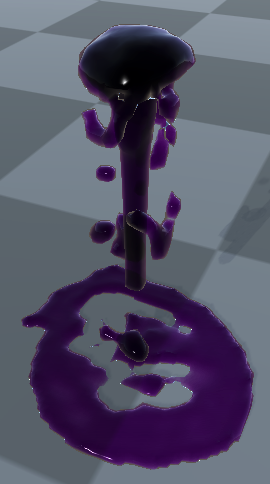
Smoothing iterations set to 0. No smoothing is performed, the raw voxelized mesh is used. 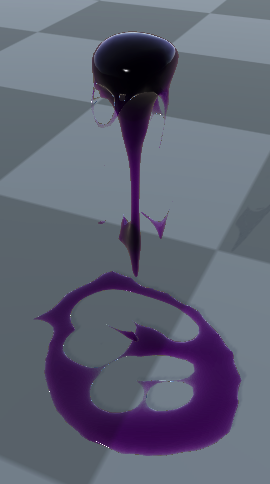
Smoothing iterations set to 4, intensity set to 1. Fluid surface is smoothed, and shrunk in the process.
- Bevel (2D only)
- When the solver is in 2D mode, controls the amount of beveling applied to the fluid edges to obtain a 3D effect.
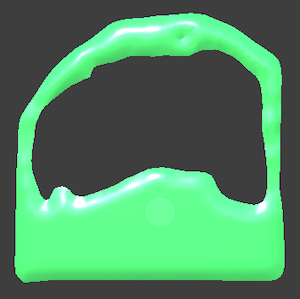
2D beveled fluid (bevel set to 1) 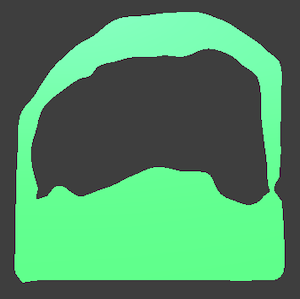
2D flat fluid (bevel set to 0)
Rendering
This controls how the mesh is rendered.
- Material type
- Determines the material used to render the fluid. Obi comes with two materials intended for opaque and transparent fluids, and you can use your own custom material too.
The included opaque material works in all render pipelines, provided that you add your pipeline as a target in ShaderGraph. The transparent one works in both the built-in pipeline and URP, however HDRP has much better transparent/refractive shading capabilities out of the box so you should use a custom transparent shader in HDRP. For information on how to write a custom shader, see Custom fluid shaders at the end of this page, and a video on how to create and set up a custom shader for HDRP.
When using transparent material in URP, you need to enable opaque and depth buffer generation in your pipeline asset: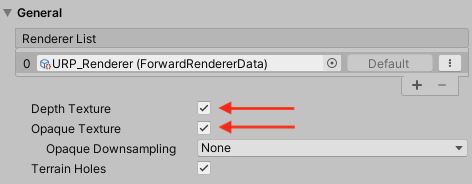

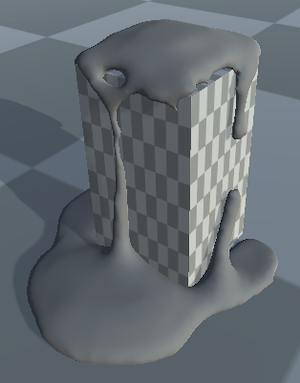
Opaque fluid 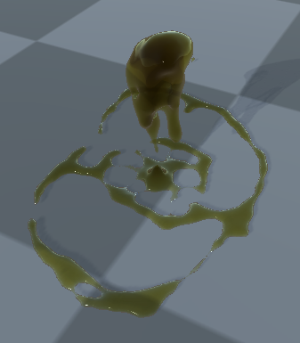
Transparent fluid
- Smoothness
- Controls overall surface smoothness of the fluid. Higher values lead to more pronounced specular highlights.
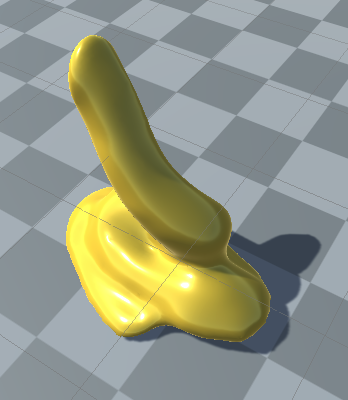
Smoothness set to 0.1 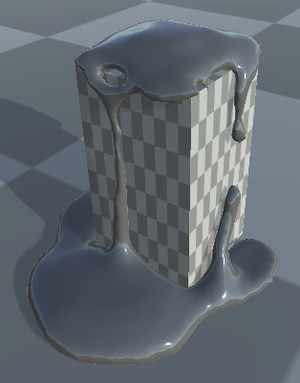
Smoothness set to 0.9
- Metallic
- Controls surface metallicity. Higher values lead to metallic-looking fluids.
Metallic set to 0 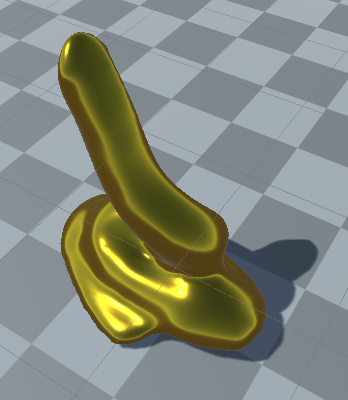
Metallic set to 1
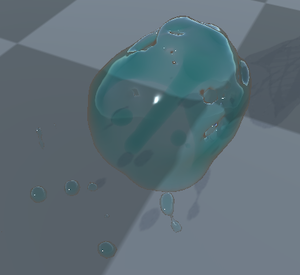
- Turbidity
- Simulates scattering due to suspended particles in the fluid (turbidity). As turbidity increases, it is harder to see objects behind the fluid. RGB channels determine scatter color, while alpha (A) determines directional intensity. Turbidity is also scaled by thickness,
so thicker fluid areas scatter away more color.
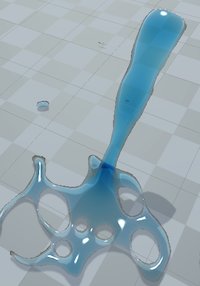
Blue fluid with yellow turbidity, with low alpha. 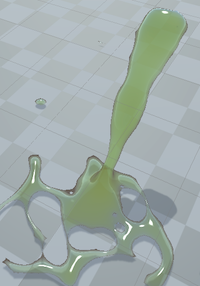
Blue fluid with yellow turbidity, with medium alpha. 
Blue fluid with yellow turbidity, with high alpha.
- Thickness
- How much light is absorbed by the fluid, as light travels trough it: higher values will tint the background with the fluid color.
Low thickness (2) 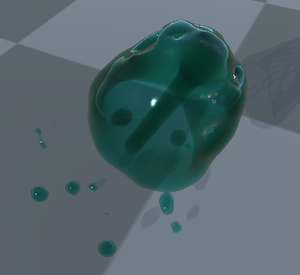
High thickness (14)
- Index of Refraction
- Index of refraction (IOR) of the fluid material. A IOR value of 1 means no refraction will take place. Larger values will cause more refraction and also increase the reflectivity of the fluid's surface. For reference, water has a IOR of 1.33.
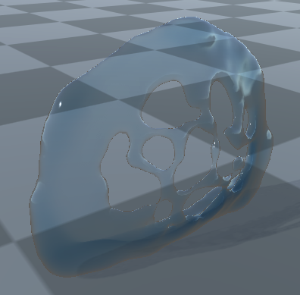
Index of refraction set to 1. Notice how the background is undistorted. 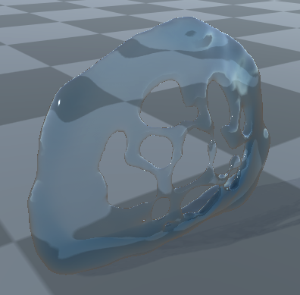
Index of refraction set to 1.3. Notice how fluid distorts the background.
- Diffuse map
- Diffuse texture to be applied on the fluid. On opaque fluids, this texture is applied all over the fluid's surface.

Untextured fluid. 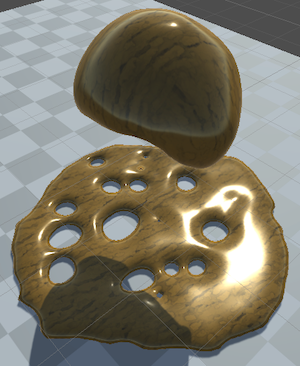
Fluid with a diffuse map.
On transparent fluids, this is modulated by the foam potential, so that the diffuse texture is only visible on areas with high foam potential. This enables a cheap texture-based way to simulate foam that can be a good alternative (or complement) to large amounts of advected particles.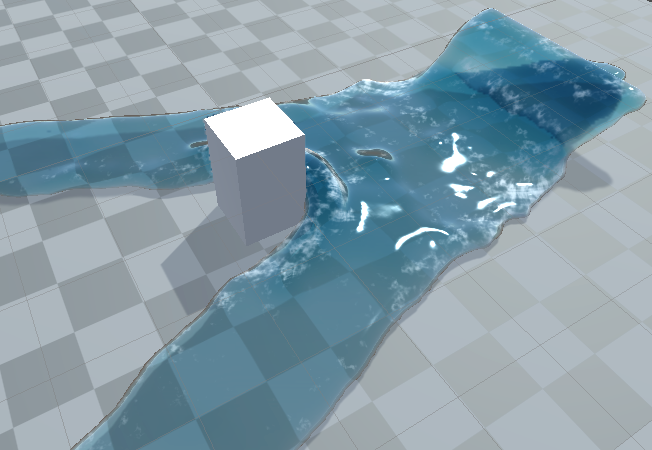
Diffuse foamy texture added to a transparent fluid, only appears in areas of high foam potential. - Diffuse color
- Tint of the diffuse map, only available for transparent fluids. In opaque fluids, the diffuse map is tinted using fluid color.
- Normal map
- Normal textures to be applied on the fluid. Note that only opaque fluids can use normal maps, the normal map is applied all over the fluid's surface.
Untextured fluid. 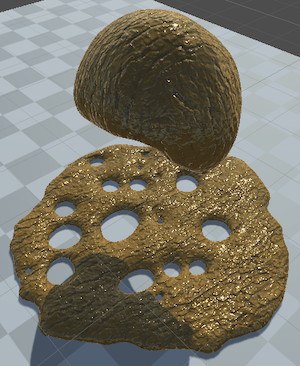
Fluid with both a diffuse and a normal map.
- Normal map intensity
- Percentage of the normal map detail applied.
- Normal map Velocity
- Scales the intensity of the normal map based of fluid velocity. The X value is the velocity at which normal intensity is 0%, and the Y value the velocity at which normal intensity is 100%. If you want the normal map to always be fully visible regardless of velocity, set X > Y.
- Tiling
- Tiling applied to diffuse and normal textures.
- Advect timescale
- Fluids will advect (carry) the texture applied to the mesh, so that it looks as if moving together with the fluid. This parameter scales advection time.
- Advect jump
- Amount of texture jump in the U and V directions every cycle of texture advection. Set to zero if you don't want textures to move when the fluid is completely at rest.
- Advect offset
- Offsets the texture advection cycle, varying the amount of texture stretching. A value of -0.5 yields unstretched textures, a value of 0 yields maximum stretching.
- Triplanar blend
- Exponent applied to triplanar texture blending. Higher values lead to sharper transitions between the 3 texture projections (top, front, side).
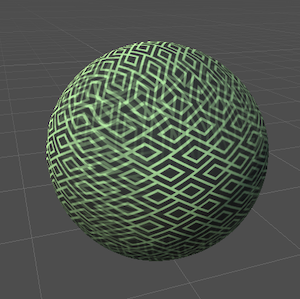
Low triplanar blend, the blending area between all 3 projections is very wide and can make the surface look blurry. 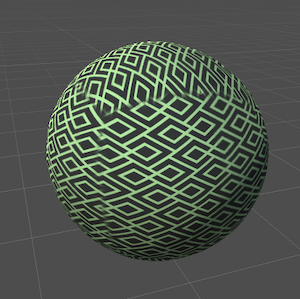
High triplanar blend, the blending area between all 3 projections is very narrow, but it can make the transition look too sharp.
Baking meshes
ObiFluidSurfaceMesher components support mesh baking. This can be useful when you turn fluid into a static mesh for set dressing/world building without spending resources on runtime simulation. To do this, right click on your ObiFluidSurfaceMesher component and select "Bake Mesh" from the context menu. Unity will then ask you to save the mesh as an asset file in your project.
3) Creating a fluid renderer feature
Creating a renderer feature is done in a slightly different way depending on which scriptable render pipeline you're using:
- Built-in
- Add a ObiFluidBuiltInRendererFeature component to any object in the scene.
- Universal (URP)
- Add a ObiFluidRendererFeature to the feature list of your pipeline's Renderer asset, see the following picture:
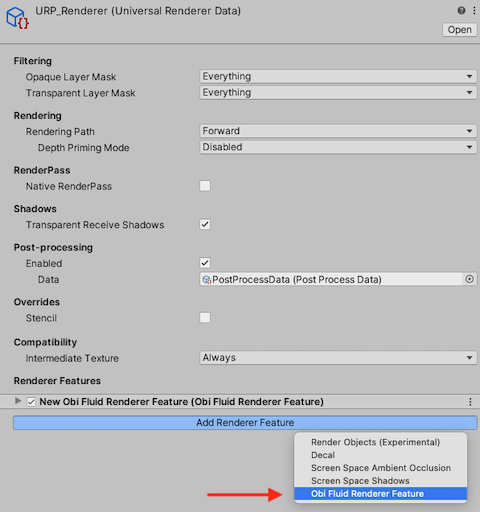
Once you've created the renderer feature, add your pass(es) to its "Passes" list. The renderer feature will then provide the necessary buffers for transparent fluid rendering to the specified passes.

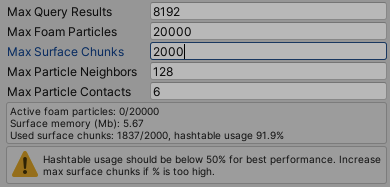
Memory budget
Obi uses an algorithm called surface nets to build the fluid surface mesh. This algorithm is based on voxels, Obi stores these voxels in groups of 64 voxels called chunks. You can set a memory budget for storing surface chunks in the ObiSolver component, under the "Memory budget" foldout:
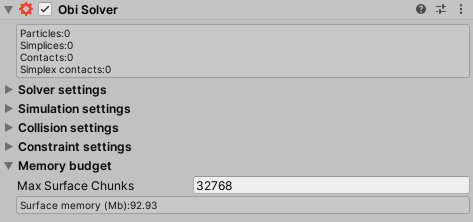
Along with parameters to control your memory budget, some statistics are also displayed. These include the amount of memory destined to fluid rendering, and the usage percentage of the allocated memory.
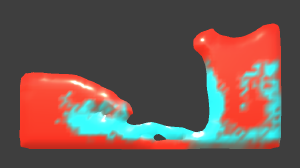
If the amount of chunks used by the simulation exceeds a percentage of around 50% of the maximum, it will slow down considerably. It is advisable to keep the usage below 50%, if it exceeds this value the inspector will show a warning to let you know you should increase the maximum amount of surface chunks:
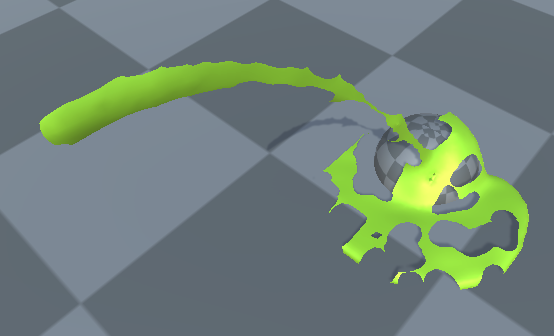
It is possible for fluid rendering to use up the maximum amount of chunks, hence running out of memory. In that case you'll notice holes due to missing chunks in the fluid mesh (see the following image for an example of how this looks like). If this is your case, you must increase your maximum amount of surface chunks.
Custom fluid shaders
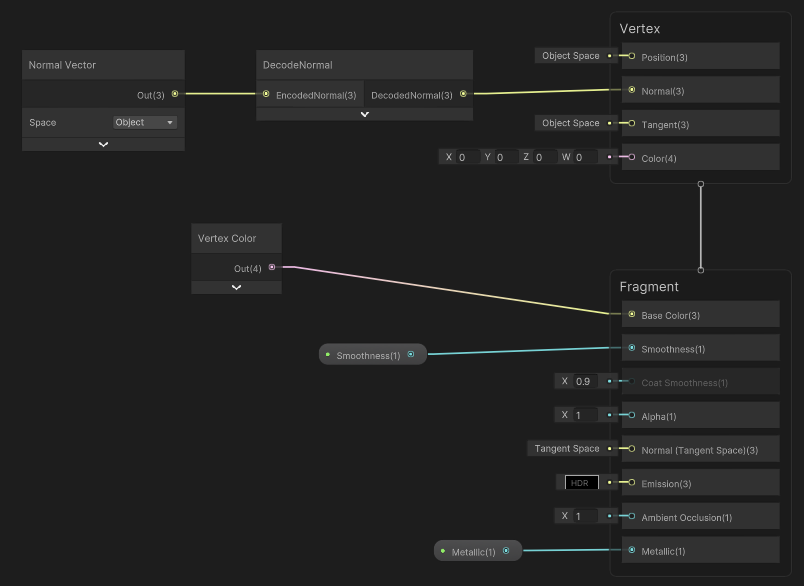
You can use ShaderGraph to build custom fluid shaders for any render pipeline, then supply a material using them to your fluid mesher (by setting its Material Type to "Custom"). The only difference with a regular shader is that fluid meshes use a special compressed vertex format, so you must add a specific node to your graph to uncompress vertex data. Which node to use depends on whether your shader is intended for the Burst or Compute backends
When using the Burst backend, fluid mesh vertices are sent from the CPU to the GPU. Vertex normals use octahedral encoding, so you need the DecodeNormal node to decode them. Here's a minimal fluid shader for the Burst backend:
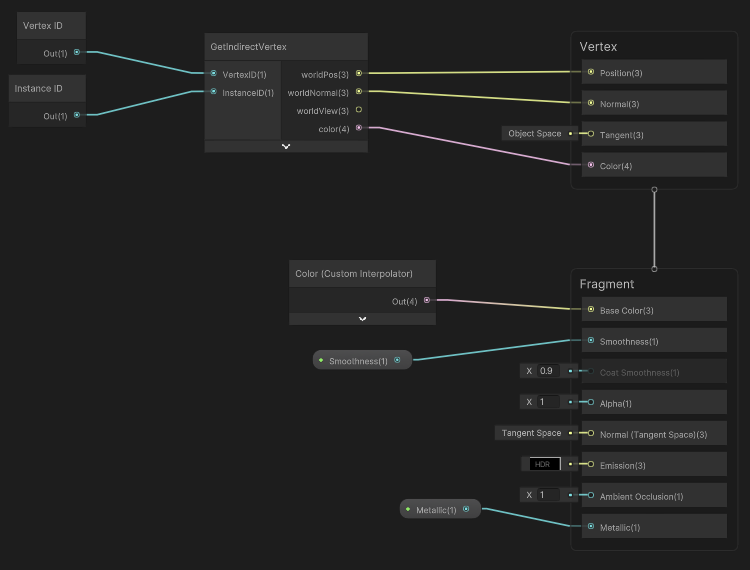
When using the Compute backend, fluid mesh vertices are generated and rendered by the GPU. You need to use the GetIndirectVertex node to retrieve vertex data. Here's a minimal fluid shader for the Compute backend:
Here you can find a video that shows the complete process of creating and setting up a custom shader for use with HDRP.