Particle editing
Create a plane (GameObject->3D Object->Plane). Then, set up an ObiCloth component for it (see cloth setup for a guide on how to do this).
Now enter particle edition mode by pressing the "Edit Particles" button in its inspector.
If you press ![]() now, you'll see the plane falling. Press
now, you'll see the plane falling. Press ![]() , then
, then ![]() to stop the simulation and reset it.
to stop the simulation and reset it.
Now, we are going to fix the four corners of
our plane, so that it won't fall into the void ;). To do so, hold the shift key on your keyboard and click on each of the four particles at the corners of the plane.
Then, click on ![]() . The four particles should turn red.
. The four particles should turn red.
Pressing ![]() again should yield much more exciting results.
again should yield much more exciting results.
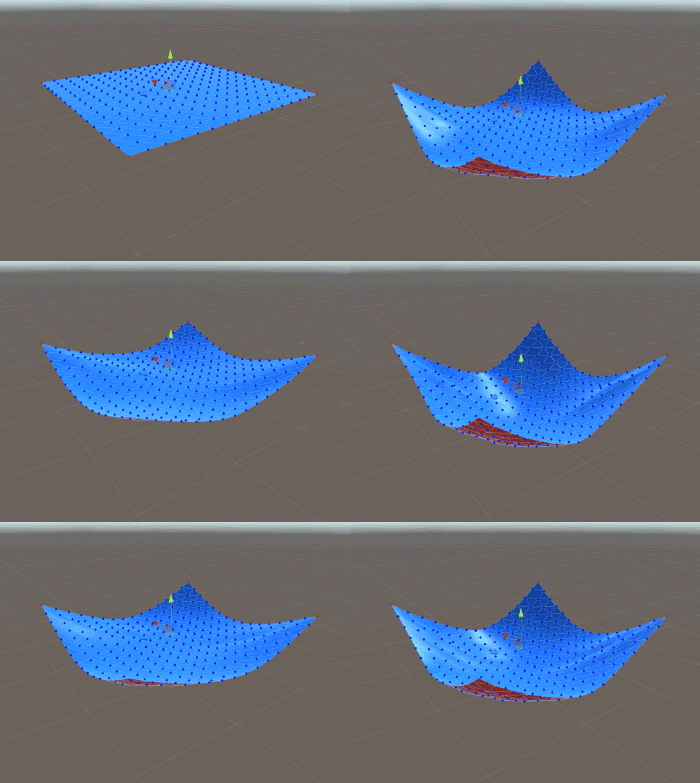
If you feel like it, try to unfix two of the corner particles while the simulation is running, coming back to the "scene" view. To do this select them and press ![]() . As you can see, the preview reacts in realtime to any changes made to the cloth.
. As you can see, the preview reacts in realtime to any changes made to the cloth.
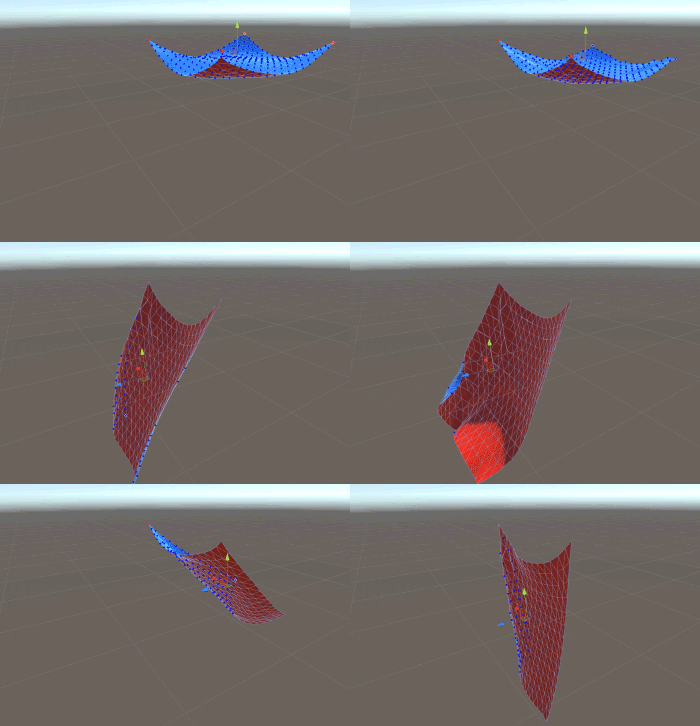
You can select several particles at once by holding Ctrl on your keyboard, then dragging a rectangle around all particles.
There's a lot more you can do while in particle editing mode, this is just a small glimpse.
Particle Editor window
The Particle Editor Window, shown in the bottom-right corner of the Scene view, has 5 rows of color-coded tools that allow you to manipulate per-particle properties of your actor.
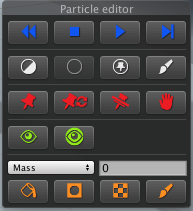
Playback tools
Shown in blue, the 4 playback tools allow you to quickly preview your cloth simulation while in edit mode, whithout having to enter play mode. Note that edit mode playback will ignore rigidbodies, so if your simulation requires advanced interaction with the rest of the scene you´ll still have to go into play mode.
![]() Rewind: stops playback and resets your simulation to the rest state.
Rewind: stops playback and resets your simulation to the rest state.
![]() Stop: stops the simulation.
Stop: stops the simulation.
![]() Play: starts or resumes the simulation.
Play: starts or resumes the simulation.
![]() Advance frame: pauses the simulation, and advances it frame by frame.
Advance frame: pauses the simulation, and advances it frame by frame.
Selection tools
Shown in white, the 4 selection tools allow you select/deselect particles in various ways. Apart from using these tools, while in edit mode you can individually select particles by clicking on them (holding the shift key while clicking will deselect them instead) and you can drag a selection marquee by holding down control in your keyboard while dragging, which is useful to select groups of particles at once.
![]() Invert: inverts the current selection: selected particles will be deselected, and unselected particles will be selected.
Invert: inverts the current selection: selected particles will be deselected, and unselected particles will be selected.
![]() Clear: deselects all particles.
Clear: deselects all particles.
![]() Select fixed: selects all fixed particles. To select unfixed particles, first use Select fixed and then use Invert.
Select fixed: selects all fixed particles. To select unfixed particles, first use Select fixed and then use Invert.
![]() Brush selection: allows you to select particles by dragging a brush over them. Holding down the shift key will deselect particles instead.
Brush selection: allows you to select particles by dragging a brush over them. Holding down the shift key will deselect particles instead.
Fixing tools
Shown in red, fixing tools allow you to fix and unfix particles, and also create handles out of them.
![]() Fix: fixes the selected particles relative to the actor's local frame. This sets the particle mass and rotational mass to infinite, and sets its velocity to zero. Fixed particles will follow the actor transform's position, rotation and scale as if parented to it. Gravity, forces, collisions and constraints won´t affect them.
Fix: fixes the selected particles relative to the actor's local frame. This sets the particle mass and rotational mass to infinite, and sets its velocity to zero. Fixed particles will follow the actor transform's position, rotation and scale as if parented to it. Gravity, forces, collisions and constraints won´t affect them.
![]() Fix position only: fixes the selected particles relative to the actor's local frame. This sets the particle mass to infinite, and sets its velocity to zero. Fixed particles will follow the actor transform's position and scale, however they will rotate freely. Gravity, forces, collisions and constraints won´t affect them.
Fix position only: fixes the selected particles relative to the actor's local frame. This sets the particle mass to infinite, and sets its velocity to zero. Fixed particles will follow the actor transform's position and scale, however they will rotate freely. Gravity, forces, collisions and constraints won´t affect them.
![]() Unfix: un-fixes the selected particles, resetting their mass and rotational mass to 1. Make sure to set the actual desired masses after unfixing particles!
Unfix: un-fixes the selected particles, resetting their mass and rotational mass to 1. Make sure to set the actual desired masses after unfixing particles!
![]() Create handle: creates a handle out of the currently selected particles.
Create handle: creates a handle out of the currently selected particles.
Visualization tools
In this category, shown in green, there's only one tool.
![]() Backface culling. Used to toggle between visualizing only front-facing particles, back-facing particles, or both. Only works with ObiCloth.
Backface culling. Used to toggle between visualizing only front-facing particles, back-facing particles, or both. Only works with ObiCloth.
Property tools
These tools, shown in orange, allow you to visualize and set per-particle properties. This is a very important feature of Obi, so you should eventually master it.
![]() Current property channel: lets you select the property channel you're visualizing/painting. The default is mass, different actors will offer different property channels in this dropdown list. For instance, ObiCloth lists these particle properties:
Current property channel: lets you select the property channel you're visualizing/painting. The default is mass, different actors will offer different property channels in this dropdown list. For instance, ObiCloth lists these particle properties:
- Mass: mass of the particles, in kilograms (kg).
- Radius: radius of the particles used for collision detection against colliders and other particles.
- Phase: collision phase, used to filter out collisions against colliders and other particles. (see collisions)
- Skin radius: defines area of freedom for skin-constrained particles. (see skin constraints)
- Skin backstop radius: defines radius of backstopping sphere for skin-constrained particles. (see skin constraints)
- Skin backstop: defines distance of backstopping sphere for skin-constrained particles. (see skin constraints)
- Skin stiffness: defines stiffness of skin constraints. (see skin constraints)
However, ObiTearableCloth does not list any of the skin constraints-related properties, and instead offers Tear Resistance, which allows you to define zones where the cloth is weaker or more resistant to tearing.
![]() Property value: current property value for the selected particle(s). If you have multiple particles selected and they have different properties, a dash (-) will appear here.
Property value: current property value for the selected particle(s). If you have multiple particles selected and they have different properties, a dash (-) will appear here.
![]() Fill: applies the current property value shown in the Selection value field to all particles, selected or not.
Fill: applies the current property value shown in the Selection value field to all particles, selected or not.
![]() Selection mask: restricts all property painting iperations (including Fill) to the currently selected particles only.
Selection mask: restricts all property painting iperations (including Fill) to the currently selected particles only.
![]() Texture tools: allows you to load particle properties directly from a texture. While in texture mode, a few new controls appear:
Texture tools: allows you to load particle properties directly from a texture. While in texture mode, a few new controls appear:
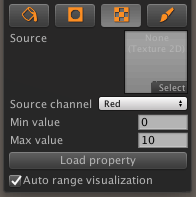
Source: lets you select the source texture to read from. Important: the texture must be readable, so make sure you check "Read/Write Enabled" in the texture import settings.
Source channel: which channel (r,g,b,a) of the texture to read values from.
Min value: values of 0 (black) in the selected texture channel will be mapped to this property value.
Max value: values of 1 (white) in the selected texture channel will be mapped to this property value.
Load property: reads the selected texture channel and applies its values to the particles, using the min/max values to map pixel intensity values to the desired property range.
Auto range visualization: maps the ramp used to visualize values so that the darkest color corresponds to the minimum value of all particles, and the lightest color to the maximum.
![]() Painting tools: allows you to load particle properties by using a brush. The property value painted is taken from the Property value field, so for instance if you wish to paint a mass value of 0.01 kg, you should ensure property channel dropdown is set to "Mass", write down 0.01 in the property value field, and start painting.
Painting tools: allows you to load particle properties by using a brush. The property value painted is taken from the Property value field, so for instance if you wish to paint a mass value of 0.01 kg, you should ensure property channel dropdown is set to "Mass", write down 0.01 in the property value field, and start painting.
While in this mode, new tools appear.
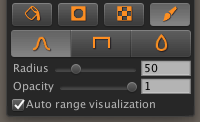
![]() Pencil mode: the painting brush will have hard edges.
Pencil mode: the painting brush will have hard edges.
![]() Pencil mode: the painting brush will have soft edges.
Pencil mode: the painting brush will have soft edges.
![]() Smooth mode: the painting brush will smooth out property values, instead of painting.
Smooth mode: the painting brush will smooth out property values, instead of painting.
Radius: brush radius in pixels.
Opacity: percentage of the current value added or subtracted (if pressing shift) per second.
Auto range visualization: maps the color ramp used to visualize values so that the darkest color corresponds to the minimum value of all particles, and the lightest color to the maximum.