You need to own Obi Rope asset for these features
Use Case: Robot Arm
This example will show you how to set up dynamic cables for a robot arm. You´ll learn about ObiHandles on our way there.

Dynamic cables and robots are a match made in heaven.
We will assume the robot itself is already made, and will not go into details about how to make one. The one used in this example is just a few primitive shapes parented together, and has been assembled completely inside Unity.
The first thing we will need to do is to lay out the path our cable should follow when the robot is at rest. To do so, we´ve chosen the ObiBezier curve, since we want to be able to create a sharp curvature change at the arm joint. Just create a new GameObject, call it "Cable", and add an ObiBezier component to it. Then edit the curve until you're satisfied with it.

Now, create a new GameObject, call it "DynamicCable" and add the ObiRope and ObiSolver components to it. Set everything up as usual: assign the solver to the rope's "Solver" property, assign the ObiBezier curve to the rope's "Rope path" property, and also add a rope section to the "Section" property. We've used a simple octagonal circular section for our cable. (for more information see Rope setup and ObiSolver).
Click "Initialize" and a nice pink cable will show up. This pink color is Unity's way of telling you you haven´t assigned any material to it, so go ahead and drag a material to the cable's MeshRenderer component. With a smooth blue material, ours looks like this:

If you were going to hit "play" at this stage, the cable would just fall down and trough the floor. This is because we haven´t attached the cable to our robot, nor told it to collide with anything. ObiRopes are made out of particles, as everything in Obi. Particles can be attached to objects in two ways:
- Fix them!: fixed particles will return to their original local position, and will blindly follow their GameObject movements.
- Pin them!(with pin constraints): pinned particles will follow any GameObject's movements, and if the object they're pinned to contains a Rigidbody component, it will feel all forces applied by the particles. This is also known as "two-way" interaction.
Here we don´t really need pin constraints, because the robot arm is not made out of rigibodies, and even if it was, we are not really interested in it being affected by the cable inertia or anything. We just need the cable to follow the arm's movements, so we will fix the particles.
However, fixing the particles won´t be enough either, since the arm is made of multiple objects and fixed particles will always stay fixed in the rope object's local space. We need a way to essentially turn our particles into GameObjects, which can then be parented to the arm.
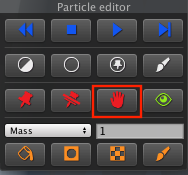
Enter ObiHandles. A handle is just a glorified particle (or group of particles) which can be translated, rotated, or scaled as a GameObject. To generate a handle, select your rope and enter particle edit mode (click "Edit Particles" in the ObiRope inspector). Then, select any particles you want turned into a GameObject, and click the "Create Handle" button (hand icon) in the particle edit menu. This will generate a new GameObject in your scene, named "Obi Handle" by default.
We will need to create three handles: one for the bottom arm attachment, one for the middle joint, and another for the actuator attachment. So we select a couple particles at the bottom end of the cable, and hit "Create Handle". Then, select a couple particles near the joint (the arm's "elbow"), click "Create Handle". Finally, a couple particles near the actuator (the robot's "hand") and hit "Create Handle".
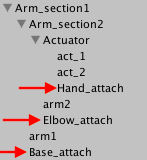
You should now have three "Obi Handles" in your scene hierarchy. Rename them to something meaningful ("Base_attach","Elbow_attach","Hand_attach", for instance) and then parent them to your robot's arm objects. At this stage, our hierarchy looks like this:
Hit play, and you should see a really saggy cable attached to the arm. This is because our solver isn't spending much time in distance or bend constraints. Go to your ObiSolver component, and crank up the amount of distance and bending iterations to about 20. That will get you the result you see at the top of this page.
In this case, the cable cannot really collide with anything in the scene because there's no way for it to fall to the ground or hit a wall, so we haven´t set up collisions. See this manual page for detailed info on how to set them up.