Softbody rendering
Softbody simulation and rendering are taken care of by two separate components: ObiSoftbody (simulation) and ObiSoftbodySkinner(rendering). The former simulates a particle-based softbody. The latter skins an arbitrary mesh to that particle-based representation, so that they move and deform together.
Using two separate components lets you decouple simulation and rendering, which is oftentimes very useful. Also please note that you're not forced to have a single ObiSoftbody skinner for each ObiSoftbody, you can bind multiple meshes to a single softbody by using multiple ObiSoftbodySkinners.
Obi Softbody Skinner
This component automatically binds a SkinnedMeshRenderer to a softbody actor. This is done by searching for the closest particles to each mesh vertex and assigning distance-based weights, then storing this binding information in a skinmap asset.
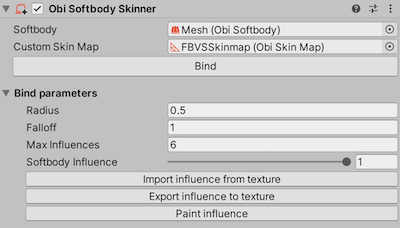
Source softbody
The softbody to skin this object's SkinnerMeshRenderer component to.
Custom skinmap
The binding information generated by this component is stored in a skinmap asset. You can create one at Assets→Create→Obi→Skinmap, or by right clicking in a project folder and selecting Create→Obi→Skinmap. You can also click the "Create" button right next to the skinmap property, and a new skinmap will be created for you in a folder of your choice.
When a custom skinmap is in use, the binding options will appear in the inspector. Once you click the Bind button, Obi will bind the mesh to the softbody particles using the options you provided. Note that altering the binding options (influence, falloff, etc.) won't have any affect on the skinning results until you click "Bind".
Softbody Influence
Global percentage of softbody influence on the skinning. A value of 0 will keep the original skinning, if any. A value of 1 will fully skin vertices to the n-closest particles within Skinning Max Distance of them. Intermediate values allow you to blend between fully animated and fully simulated skinning.
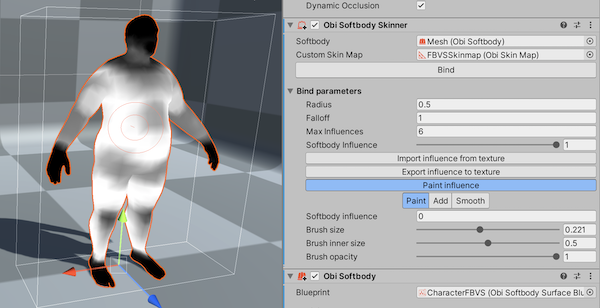
You can paint influence per-vertex using the "Paint Influence" button. In this case, the global softbody influence parameter will act as a multiplier of the per-vertex influence you paint:
Radius
Maximum distance to consider when skinning each vertex. Particles further away than this distance will not be considered, so usually it's a good idea to use a value large enough for all vertices in the mesh to be within this distance from their nearest particle.
Falloff
Intensity of the skinning falloff. A value of 1 means linear falloff, larger values increase falloff exponent, thus giving more weight to particles closer to the vertex.
Max influences
Maximum amount of particles that can influence a single vertex.
Baking meshes
ObiSoftbodySkinner components support mesh baking. This can be useful when you turn softbody into a static mesh for set dressing/world building without spending resources on runtime simulation. To do this, right click on your ObiSoftbodySkinner component and select "Bake Mesh" from the context menu. Unity will then ask you to save the mesh as an asset file in your project.